가상 선택자
가상 선택자: 마우스의 특정한 가상 액션 상황 가정
선택자 뒤에 :가상이벤트를 붙이면 특정 이벤트마다 적용할 스타일을 설정할 수 있다.
| :checked | 체크 상태의 input 태그를 선택 |
| :focus | 초점이 맞추어진 input 태그를 선택 |
| :enabled | 사용 가능한 input 태그를 선택 |
| :disenabled | 사용 불가능한 input 태그를 선택 |
| :link | 방문한 적이 없는 링크 |
| :visited | 방문한 적이 있는 링크 |
| :hover | 마우스를 롤오버했을 때 |
| :active | 마우스를 클릭했을 때 |
[예시]
<!DOCTYPE html>
<html lang="en">
<head>
    <meta charset="UTF-8">
    <meta name="viewport" content="width=device-width, initial-scale=1.0">
    <title>page21_selector.html</title>
    <style type="text/css">
        /* 처음 링크시: 방문하기 전 */
        a:link{
            color:green;
            text-decoration: none;
        }
        /* 링크: 방문 후 */
        a:visited{
            color:red;
        }
        /* 마우스오버시(마우스를 가져다 댔을 때) */
        a:hover{
            font-size:1.2em;
            color:blueviolet;
        }
        /* 마우스 클릭시 */
        a:active{
            background-color: salmon;
        }
        /* input요소 중 비활성화된 요소의 배경색을 gray로 주세요 */
        input:disabled{
            background-color: gray;
            color:aliceblue;
        }
        /* input요소 중 활성화된 요소의 border을 바꿔 주세요 */
        input:enabled{
            border: 2px solid pink;
        }
        /* input요소 중 입력 포커스가 온 요소의 배경색을 lawngreen으로 주세요 */
        input:focus{
            background-color: lawngreen;
        }
        /* 버튼에 마우스오버시 배경색: yellow로, 글자색: blue로 주세요 */
        button:hover{
            background-color: yellow;
            color:blue;
        }
        /* class가 google인 요소를 선택해서 배경색을 알아서 주세요 */
        h1.google{
            background-color: cornflowerblue;
        }
        /* class가 google이 아닌 a 요소를 선택해서 배경색을 bisque로 주세요
            선택자:not(배제할요소)
        */
        a:not(.google){
            background-color: bisque;
        }
    </style>
</head>
<body>
    <h1 class="google">가상 선택자</h1>
    <p>특정한 가상 액션 상황을 가정한 선택자</p>
    <h2>하이퍼링크 스타일</h2>
    <a href="http://www.naver.com">네이버</a><br><br>
    <a href="http://www.google.com" class="google">구글</a><br><br>
    <a href="http://www.daum.net">다음</a><br><br>
    <a href="http://www.nate.com">네이트</a><br><br>
    <hr color="blue">
    userid: <input type="text" value="apple" disabled> <!--disabled: 비활성화(수정 불가능)-->
    userName: <input type="text" value="김사과" enabled> <!--enabled: 활성화(생략 가능)-->
    <br><br>
    <button>로그인</button>
</body>
</html>
가상 요소 선택자
가상 요소 선택자란?
- CSS에서 실제로 존재하지 않는 요소나 범위를 만들어서 스타일을 적용할 때 사용
- HTML 코드 상으로는 존재하지 않지만, CSS를 통해 가상으로 만들어 표현하고자 할 때 사용하는 선택자
- 가상 선택자와 구분하기 위해 가상요소 이름 앞에 콜론 2개(::)를 붙여 표시한다.
| 요소::first-letter | 요소 중 첫 번째 글자를 선택 |
| 요소::first-line | 요소의 첫 번째 줄을 선택 |
| 요소::after | 요소 이후에 스타일 적용 |
| 요소::before | 요소 이전에 스타일 적용 |
| 요소::selection | 선택한 요소 |
[예시]
<!DOCTYPE html>
<html lang="en">
<head>
    <meta charset="UTF-8">
    <meta name="viewport" content="width=device-width, initial-scale=1.0">
    <title>page22_selector.html</title>
<style>
    /* 가상요소 선택자: 가상으로 요소를 만들어 추가할 때 사용
        가상 선택자와 구분하기 위해 가상요소 이름 앞에 콜론(::) 2개를
        붙여 표시한다
        - 요소::first-letter : 요소 중 첫 글자를 선택
        - 요소::first-line: 첫 번째 줄을 선택
        - 요소::after : 요소 이후에 스타일 적용
        - 요소::before : 요소 이전에 스타일 적용
        - 요소::selection : 선택한 요소
    */
    h1::before{
        content:"CSS3 ";
        color:peru;
    }
    h1::after{
        content:" HTML5";
        font-family: 궁서체;
        color:green;
    }
    p::first-letter{
        font-size:3em;
    }
    p::first-line{
        background-color: hotpink;
    }
    p::selection{
        background-color: #ddd;
    } /* selection: 마우스로 드래그한 영역이 회색으로 바뀜 */
</style>
</head>
<body>
    <h1>가상 요소 선택자</h1>
    <p>orem ipsum dolor sit amet, consectetur adipiscing elit.
        Explicabo illum sunt distinctio sed, tempore, repellat
        rerum et ea laborum voluptatum! Quisquam error fugiat
        debitis maiores officiis, tenetur ullam amet in!
    </p>
</body>
</html>
속성 선택자
1. 기본 속성 선택자
1) [속성이름] 선택자
특정 속성을 가지고 있는 요소를 모두 선택
/* src 속성을 가지고 있는 모든 요소를 선택해서 padding-left:50px 적용 */
<style>
    [src]{padding-left: 50px;}
</style>
<body>
<img src="images/a.png" >
<img src="images/bird.jpg" width="30%">
<img src="images/swing.gif">
</body>
2) [속성이름 = "속성값"] 선택자
특정 속성을 가지고 있으며, 해당 속성의 속성값까지 일치하는 요소를 선택
/* input요소 중 type이 text인 요소 선택 */
input[type="text"]{
    background-color: red;
    color:white;
    font-size: 30px;
}
<body>
<input type="text" name="userid" placeholder="ID">
<input type="password" name="userpw" placeholder="Password">
</body>
2. 문자열 속성 선택자
HTML 요소가 가지고 있는 특정 속성의 속성값 내에 특정 문자열을 확인하여 선택해 준다.
| 선택자[속성 = 값] | 특정한 값과 일치하는 태그 선택 |
| 선택자[속성 ^= 값] | 특정한 값으로 시작하는 태그 선택 |
| 선택자[속성 $= 값] | 특정한 값으로 끝나는 태그 선택 |
| 선택자[속성 *= 값] | 특정한 값을 포함하는 태그 선택 |
<style>
    /*[1] img요소 중 확장자가 png인 이미지를 선택해서
    border: 10px dashed 색상
    [2] gif 끝나는 이미지 선택
    border:20px dotted 색상
    [3] jpg
    border: 30px double 색상
    */

    img[src $=".png"]{
    border: 10px dashed chocolate;
    }
    img[src $=".gif"]{
    border: 20px dotted chartreuse;
    }
    img[src $=".jpg"]{
    border: 30px double hotpink;
    }

    /* a태그 중 href가 http로 시작하는 요소를 찾아서 글자크기 2em으로 주세요 */
    a[href^="http"]{
    font-size:2em;
    }
    /* a태그의 title 속성 값에 good을 포함하는 요소들을 찾아서 글자색을 달리 주세요 */
    a[title *="good"]{
    color:aqua;
    }
</style>
<body>
<!-- png, gif, jpeg -->
<img src="images/a.png" >
<img src="images/bird.jpg" width="30%">
<img src="images/swing.gif">
<!-- url -->
<a href="http://www.naver.com" title="naver is good">네이버</a>
<a href="page01.html" title="page01 is good">page01</a>
</body>
[최종 코드]
<!DOCTYPE html>
<html lang="en">
<head>
<meta charset="UTF-8">
<meta name="viewport" content="width=device-width, initial-scale=1.0">
<title>page23_selector.html</title>
<style>
/* src 속성을 가지고 있는 모든 요소를 선택해서 padding-left:50px 적용 */
[src]{padding-left: 50px;}
/* input요소 중 type이 text인 요소 선택 */
input[type="text"]{
background-color: red;
color:white;
font-size: 30px;
}
/* input요소 중 name이 userpw인 요소를 선택해서 배경색,글자색,글자크기를 지정하세요 */
input[name="userpw"]{
background-color: darkcyan;
color:rebeccapurple;
font-size:1.3em;
}
/*[1] img요소 중 확장자가 png인 이미지를 선택해서
border: 10px dashed 색상
[2] gif 끝나는 이미지 선택
border:20px dotted 색상
[3] jpg
border: 30px double 색상
*/
img[src $=".png"]{
border: 10px dashed chocolate;
}
img[src $=".gif"]{
border: 20px dotted chartreuse;
}
img[src $=".jpg"]{
border: 30px double hotpink;
}
/* a태그 중 href가 http로 시작하는 요소를 찾아서 글자크기 2em으로 주세요 */
a[href^="http"]{
font-size:2em;
}
/* a태그의 title 속성 값에 good을 포함하는 요소들을 찾아서 글자색을 달리 주세요 */
a[title *="good"]{
color:aqua;
}
</style>
</head>
<body>
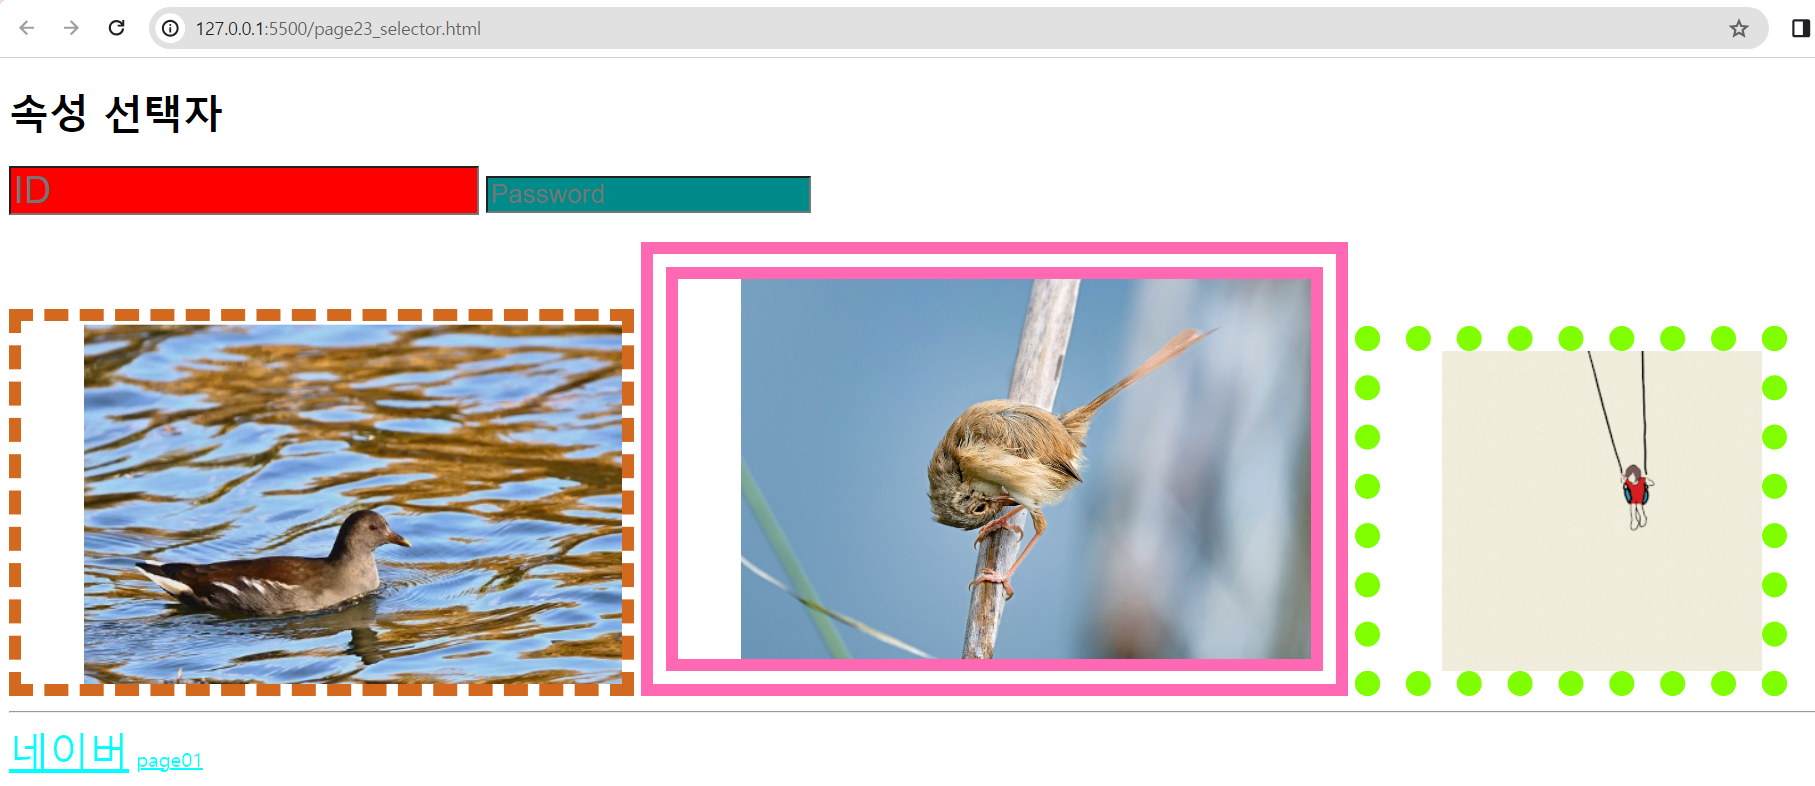
<h1>속성 선택자</h1>
<input type="text" name="userid" placeholder="ID">
<input type="password" name="userpw" placeholder="Password">
<br><br>
<!-- png, gif, jpeg -->
<img src="images/a.png" >
<img src="images/bird.jpg" width="30%">
<img src="images/swing.gif">
<hr>
<a href="page01.html" title="page01 is good">page01</a>
</body>
</html>
[실행 결과]
:not 선택자
CSS를 작성할 때 "~이 아닌 경우"와 같이 특정 선택자가 없을 때의 경우에 대한 스타일 처리를 하고 싶은 경우가 생긴다. 이러한 경우에 :not( ) 선택자를 사용하면 된다.
선택요소:not(제외요소){
}
span:not(.span1){
  background-color:yellow;
}
<span>태그 중 class가 span1이 아닌 태그를 선택하여 배경색을 노란색으로 주세요.
[실행 결과]
See the Pen Untitled by 챈챈 (@naaoviji-the-animator) on CodePen.